


前面这篇文章介绍了 Spring AOP 是如何生成代理对象的,那这篇就是研究代理对象是如何执行的。
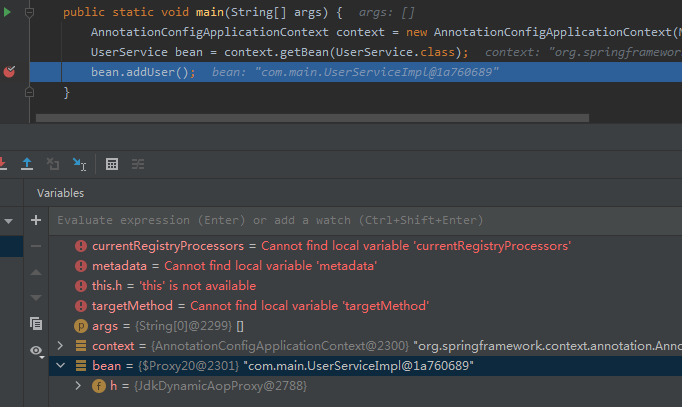
那么还是之前的代码为例,将断点打在 bean.addUser() 处。可以看到是 JDK 动态代理的类。
1. JdkDynamicAopProxy # invoke
进入方法,会执行到 JdkDynamicAopProxy 的 invoke 方法中:
public Object invoke(Object proxy, Method method, Object[] args) throws Throwable {
    Object oldProxy = null;
    boolean setProxyContext = false;

    TargetSource targetSource = this.advised.targetSource;
    Object target = null;

    try {
        // equals 方法不代理
        if (!this.equalsDefined && AopUtils.isEqualsMethod(method)) {
            return equals(args[0]);
        }
        // hashCode方法不代理
        else if (!this.hashCodeDefined && AopUtils.isHashCodeMethod(method)) {
            return hashCode();
        }
        // 来自于DecoratingProxy接口的方法,也不代理
        else if (method.getDeclaringClass() == DecoratingProxy.class) {
            return AopProxyUtils.ultimateTargetClass(this.advised);
        }
         // 目标对象本身实现了 Advised 接口,也不代理
        else if (!this.advised.opaque && method.getDeclaringClass().isInterface() &&
                 method.getDeclaringClass().isAssignableFrom(Advised.class)) {
            return AopUtils.invokeJoinpointUsingReflection(this.advised, method, args);
        }

        Object retVal;

        if (this.advised.exposeProxy) {
            oldProxy = AopContext.setCurrentProxy(proxy);
            setProxyContext = true;
        }

        target = targetSource.getTarget();
        Class<?> targetClass = (target != null ? target.getClass() : null);
        // 根据当前的方法获取匹配到的增强器
        List<Object> chain = this.advised.getInterceptorsAndDynamicInterceptionAdvice(method, targetClass);

        if (chain.isEmpty()) {
            Object[] argsToUse = AopProxyUtils.adaptArgumentsIfNecessary(method, args);
            retVal = AopUtils.invokeJoinpointUsingReflection(target, method, argsToUse);
        }
        else {
            MethodInvocation invocation =
                new ReflectiveMethodInvocation(proxy, target, method, args, targetClass, chain);
            // 构造增强器链,执行增强器的逻辑
            retVal = invocation.proceed();
        }
        // 返回值的处理
        ........
        return retVal;
    } // finally
    .........
}
1.1 getInterceptorsAndDynamicInterceptionAdvice
// AdvisedSupport
public List<Object> getInterceptorsAndDynamicInterceptionAdvice(Method method, @Nullable Class<?> targetClass) {
    MethodCacheKey cacheKey = new MethodCacheKey(method);
    List<Object> cached = this.methodCache.get(cacheKey);
    if (cached == null) {
        cached = this.advisorChainFactory.getInterceptorsAndDynamicInterceptionAdvice(
            this, method, targetClass);
        this.methodCache.put(cacheKey, cached);
    }
    return cached;
}
第一次执行后,后续执行都从缓存中取数据。核心是 getInterceptorsAndDynamicInterceptionAdvice 方法。这个方法代码有点长,拆开来看:
1.1.1 getInterceptorsAndDynamicInterceptionAdvice
这个方法代码有点长,拆开来看:
1.1.1.1 准备工作
// DefaultAdvisorChainFactory
public List<Object> getInterceptorsAndDynamicInterceptionAdvice(
			Advised config, Method method, @Nullable Class<?> targetClass) {

    AdvisorAdapterRegistry registry = GlobalAdvisorAdapterRegistry.getInstance();
    Advisor[] advisors = config.getAdvisors();
    List<Object> interceptorList = new ArrayList<>(advisors.length);
    Class<?> actualClass = (targetClass != null ? targetClass : method.getDeclaringClass());
    Boolean hasIntroductions = null;
    ......
}
这里初始化了一个 AdvisorAdapterRegistry,名字的意思是增强器适配器的注册器。而实际也确实注册了增强器适配器。
// GlobalAdvisorAdapterRegistry
private static AdvisorAdapterRegistry instance = new DefaultAdvisorAdapterRegistry();

public static AdvisorAdapterRegistry getInstance() {
    return instance;
}

// DefaultAdvisorAdapterRegistry
public DefaultAdvisorAdapterRegistry() {
    // 注册了三个增强器适配器
    registerAdvisorAdapter(new MethodBeforeAdviceAdapter());
    registerAdvisorAdapter(new AfterReturningAdviceAdapter());
    registerAdvisorAdapter(new ThrowsAdviceAdapter());
}
看名字的这三个增强器适配器分别对应
@Before、@AfterReturning、@AfterThrowing,其他两个注解@After、@Around没有对应的增强器适配器吗? 别急,这个接下来会说到。
而之前 buildAdvisors 已经把此代理对象匹配到的增强器收集到了,并放入到了 JdkDynamicAopProxy 的 AdvisedSupport 对象中,config.getAdvisors(); 的 config 类型就是 AdvisedSupport 。然后再对方法进行匹配。
1.1.1.2 方法匹配
......
for (Advisor advisor : advisors) {
    if (advisor instanceof PointcutAdvisor) {
        // 这里是 AspectJ 形式封装的 advisor
        PointcutAdvisor pointcutAdvisor = (PointcutAdvisor) advisor;
        if (config.isPreFiltered() || pointcutAdvisor.getPointcut().getClassFilter().matches(actualClass)) {
            // 根据通知方法上的切入点表达式,判断是否可以匹配当前要执行的目标对象所属类
            MethodMatcher mm = pointcutAdvisor.getPointcut().getMethodMatcher();
            boolean match;
            if (mm instanceof IntroductionAwareMethodMatcher) {
                if (hasIntroductions == null) {
                    hasIntroductions = hasMatchingIntroductions(advisors, actualClass);
                }
                match = ((IntroductionAwareMethodMatcher) mm).matches(method, actualClass, hasIntroductions);
            }
            else {
                match = mm.matches(method, actualClass);
            }
            if (match) {
                MethodInterceptor[] interceptors = registry.getInterceptors(advisor);
                if (mm.isRuntime()) {
                    // Creating a new object instance in the getInterceptors() method
                    // isn't a problem as we normally cache created chains.
                    for (MethodInterceptor interceptor : interceptors) {
                        interceptorList.add(new InterceptorAndDynamicMethodMatcher(interceptor, mm));
                    }
                }
                else {
                    interceptorList.addAll(Arrays.asList(interceptors));
                }
            }
        }
    }
    .....
这里和之前一样,通过 MethodMatcher 进行匹配。
1.1.1.3 封装为 MethodInterceptor
匹配到增强器之后,封装为 MethodInterceptor。
if (match) {
    MethodInterceptor[] interceptors = registry.getInterceptors(advisor);
    if (mm.isRuntime()) {
        // Creating a new object instance in the getInterceptors() method
        // isn't a problem as we normally cache created chains.
        for (MethodInterceptor interceptor : interceptors) {
            interceptorList.add(new InterceptorAndDynamicMethodMatcher(interceptor, mm));
        }
    }
    else {
        interceptorList.addAll(Arrays.asList(interceptors));
    }
}
public MethodInterceptor[] getInterceptors(Advisor advisor) throws UnknownAdviceTypeException {
List<MethodInterceptor> interceptors = new ArrayList<>(3);
Advice advice = advisor.getAdvice();
if (advice instanceof MethodInterceptor) {
interceptors.add((MethodInterceptor) advice);
}
// 如果对应的 advice 没有实现 MethodInterceptor 的话,就需要通过适配器来获取
for (AdvisorAdapter adapter : this.adapters) {
if (adapter.supportsAdvice(advice)) {
interceptors.add(adapter.getInterceptor(advisor));
}
}
if (interceptors.isEmpty()) {
throw new UnknownAdviceTypeException(advisor.getAdvice());
}
return interceptors.toArray(new MethodInterceptor[0]);
} 看到这里是不是就知道了为什么 AdvisorAdapterRegistry 只注册了三个增强器适配器,因为 @Before、@AfterReturning 注解对应的 Advice:AspectJMethodBeforeAdvice、AspectJAfterReturningAdvice 没有实现 MethodInterceptor 接口,而 @After、@Around 、@AfterThrowing 对应的 Advice:AspectJAfterAdvice、AspectJAroundAdvice 、AspectJAfterThrowingAdvice 实现了 MethodInterceptor 接口。小伙伴可以自行 debug 试验一下。
那还有一个 ThrowsAdviceAdapter 呢?这个主要是处理实现 ThrowsAdvice 接口的类,用来处理异常,对于 ThrowsAdvice 的注解模式,Spring 没有直接提供支持,在注解模式下,我们通常使用更为灵活的 @AfterThrowing 注解来处理方法抛出的异常,所以这里不过多讲,感兴趣的可以自行研究。
adapter.getInterceptor(advisor) 就是将 advisor 中的 advice 取出封装为 MethodInterceptor 。
1.1.1.4 其他增强器的处理
其他增强器我们一般碰不到,AspectJ 形式的都是走上面的逻辑,所以这里不深入研究了。
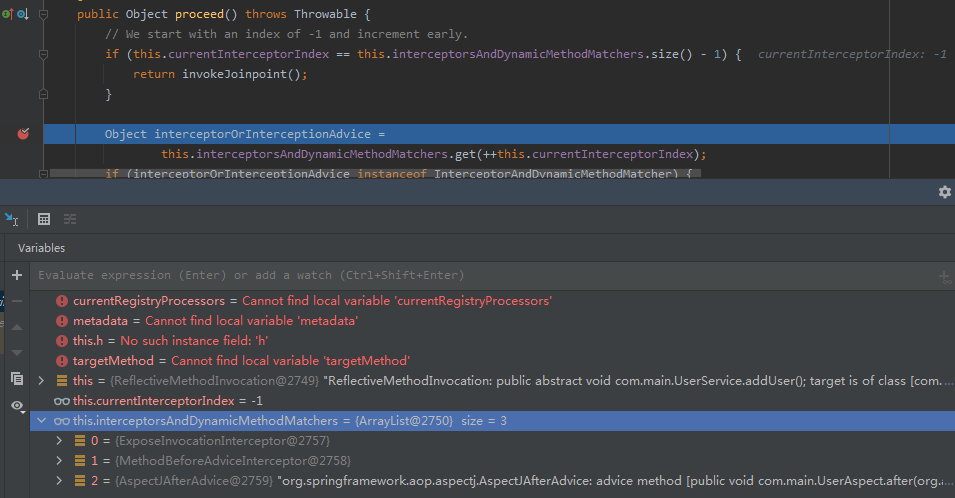
1.2 ReflectiveMethodInvocation # proceed
增强器筛选出来后,下面就是构建方法执行器,执行它的 proceed 方法。
public Object proceed() throws Throwable {
    if (this.currentInterceptorIndex == this.interceptorsAndDynamicMethodMatchers.size() - 1) {
        // 所有增强器执行完毕后,才执行目标方法
        return invokeJoinpoint();
    }

    Object interceptorOrInterceptionAdvice =
        this.interceptorsAndDynamicMethodMatchers.get(++this.currentInterceptorIndex);
    if (interceptorOrInterceptionAdvice instanceof InterceptorAndDynamicMethodMatcher) {
        InterceptorAndDynamicMethodMatcher dm =
            (InterceptorAndDynamicMethodMatcher) interceptorOrInterceptionAdvice;
        Class<?> targetClass = (this.targetClass != null ? this.targetClass : this.method.getDeclaringClass());
        if (dm.methodMatcher.matches(this.method, targetClass, this.arguments)) {
            return dm.interceptor.invoke(this);
        }
        else {
            return proceed();
        }
    }
    else {
        return ((MethodInterceptor) interceptorOrInterceptionAdvice).invoke(this);
    }
}
打断点,查看 userService 的拦截器:
 1.2.1 执行第一个增强器
又回到之前说过的 ExposeInvocationInterceptor,ExposeInvocationInterceptor 不是 InterceptorAndDynamicMethodMatcher ,走的最下面那个 else 中的方法,最终进入到它的 invoke 方法。这个方法前面说过了,下一步继续执行 proceed 方法。又回到 7.2 的 proceed 。
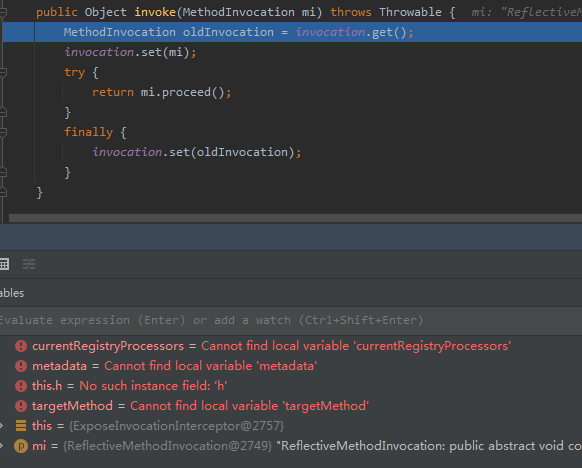 1.2.2 执行 MethodBeforeAdviceInterceptor
对 MethodBeforeAdviceInterceptor 的处理逻辑是一样的,最终进入到它的 invoke 方法,然后回调 proceed 方法。
// MethodBeforeAdviceInterceptor
public Object invoke(MethodInvocation mi) throws Throwable {
    this.advice.before(mi.getMethod(), mi.getArguments(), mi.getThis());
    return mi.proceed();
}
对于剩下的拦截器,处理流程都是类似的,不再过多赘述了。
1.3 CGLIB 代理
对于 cglib 代理呢,会进入到 CglibAopProxy 的内部类 DynamicAdvisedInterceptor 中。核心是:
public Object intercept(Object proxy, Method method, Object[] args, MethodProxy methodProxy) throws Throwable {
    .......
    List<Object> chain = this.advised.getInterceptorsAndDynamicInterceptionAdvice(method, targetClass);
    .......
    retVal = new CglibMethodInvocation(proxy, target, method, args, targetClass, chain, methodProxy).proceed();
    .......
}是不是有点熟悉,CGLIB 代理的处理逻辑和 JDK 动态代理是类似。构造了 CglibMethodInvocation ,执行 proceed 方法,而 CglibMethodInvocation 继承自 ReflectiveMethodInvocation,所以实际上就是执行 ReflectiveMethodInvocation 的 proceed 方法。和 7.2 章节中一样。
2. @EnableAspectJAutoProxy 的 exposeProxy
@EnableAspectJAutoProxy 除了有 proxyTargetClass 这个属性,还有另外一个是 exposeProxy,意为暴露代理,那这个有什么用呢?修改一下代码做个测试。
public interface UserService {

    void addUser();

    void findUser();
}


@Service
public class UserServiceImpl implements UserService {

    @Override
    public void addUser() {
        findUser();
        System.out.println("addUser 方法执行了");
    }

    @Override
    public void findUser() {
        System.out.println("findUser 方法执行了");
    }
}

@Aspect
@Component
public class UserAspect {

    @Before("execution(public * com.main.UserService.*(..))")
    public void before(JoinPoint joinPoint) {
        System.out.println("代理方法执行前");
    }
}

public class Main {

    public static void main(String[] args) {
        AnnotationConfigApplicationContext context = new AnnotationConfigApplicationContext(MainConfiguration.class);
        UserService bean = context.getBean(UserService.class);
        bean.addUser();
    }
}
给 userService 加了一个 findUser 方法,然后在 addUser 方法中加了一行 this.findUser(),执行 main 方法,可以先猜一下控制台的输出,理想情况下应该是这样的:
代理方法执行前
代理方法执行前
findUser 方法执行了
addUser 方法执行了
但实际上控制输出如下,只打印了一次切面日志:
代理方法执行前
findUser 方法执行了
addUser 方法执行了
那想要每次调用 userService 方法之前都打印一次日志要怎么改?简单的话可以这样:
@Service
public class UserService {

    @Autowired
    UserService userService;

    @Override
    public void addUser() {
        userService.findUser();
        System.out.println("addUser 方法执行了");
    }

    @Override
    public void findUser() {
        System.out.println("findUser 方法执行了");
    }
}
但是这种方法很臃肿,实际开发也不会这样写。那要怎么做? 你想要的这种效果,Spring 肯定想到了,它提供了一个 AopContext 类,使用这个类,可以获取到代理对象本身:
public void addUser() {
    ((UserService) AopContext.currentProxy()).findUser();
    System.out.println("addUser 方法执行了");
}
使用 AopContext.currentProxy() 方法就可以取到代理对象的 this 了。但是这样还不行哦,直接运行会报错:

看错误提示需要把 exposeProxy 设置为 true,而这个属性正好在 @EnableAspectJAutoProxy 注解上,默认值为 false,改为 true 重新运行,就会发现打印两次切面日志了。
@Configuration
@ComponentScan("com.main")
@EnableAspectJAutoProxy(exposeProxy = true)
public class MainConfiguration {
}
3. AspectJ 拦截不到接口上面的注解
改造之前的代码:
@Retention(RetentionPolicy.RUNTIME)
@Target(ElementType.METHOD)
@Documented
public @interface UserLog {
}

public interface UserService {

    @UserLog
    void addUser();
}

@Service
public class UserServiceImpl implements UserService {

    @Override
    public void addUser() {
        System.out.println("addUser 方法执行了");
    }
}

@Aspect
@Component
public class UserAspect {

    @Pointcut("@annotation(com.main.UserLog)")
    public void withinPointcut() {
    }

    @Before("withinPointcut()")
    public void before(JoinPoint joinPoint) {
        System.out.println("代理方法执行前");
    }
}

public class Main {

    public static void main(String[] args) {
        AnnotationConfigApplicationContext context = new AnnotationConfigApplicationContext(MainConfiguration.class);
        UserService bean = context.getBean(UserService.class);
        bean.addUser();
    }
}
新增一个注解 UserLog,切面拦截这个注解,在接口 UserService 的方法 addUser 方法加上这个注解执行 main 方法,结果如下:
addUser 方法执行了而将注解配到 UserServiceImpl 的 addUser 方法上,结果是不一样的:
代理方法执行前
addUser 方法执行了
结果说明切面并没有拦截到接口方法上面的注解,只拦截到了实现类方法上面的注解,这是为什么呢?
3.1 增强器的筛选
之前 AOP 源码分析过增强器的收集和匹配,没拦截到就肯定没有匹配到,所以还是得从源码分析。对 bean 的增强器的收集和匹配在 AbstractAdvisorAutoProxyCreator # getAdvicesAndAdvisorsForBean处,不记得的小伙伴回到上面的章节再熟悉一下哦。
protected List<Advisor> findEligibleAdvisors(Class<?> beanClass, String beanName) {
    List<Advisor> candidateAdvisors = findCandidateAdvisors();
    List<Advisor> eligibleAdvisors = findAdvisorsThatCanApply(candidateAdvisors, beanClass, beanName);
    extendAdvisors(eligibleAdvisors);
    .......
}
findCandidateAdvisors 是找出容器中所有的增强器,findAdvisorsThatCanApply 是根据当前 bean 进行筛选,分别在这两个方法执行后打断点查看结果。
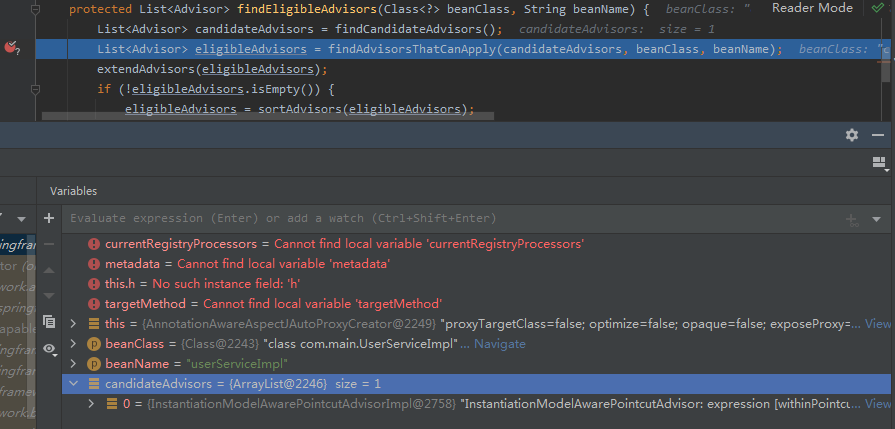
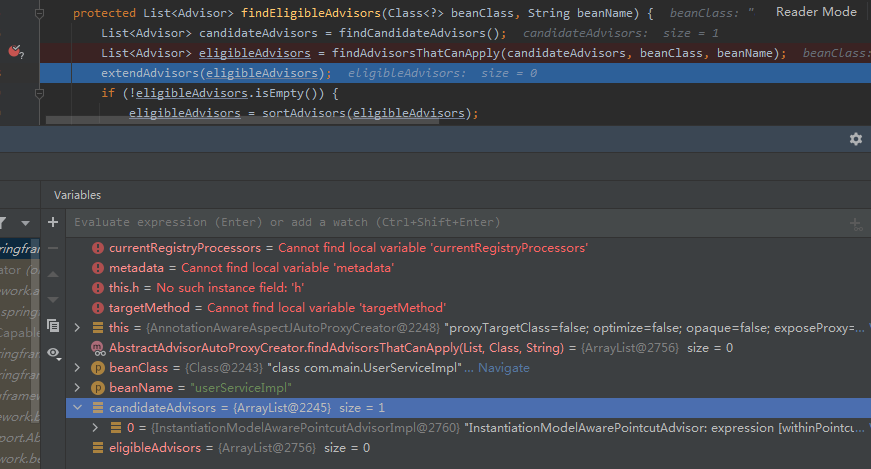
findCandidateAdvisors 已经把 UserAspect 中的增强器拿到了,但是下一步筛选的 eligibleAdvisors 为0,说明 UserAspect 的增强器匹配不到接口上面的注解。所以真正的原因就在 findAdvisorsThatCanApply 方法里面,这个方法前面也分析过,所以这里就根据调用链直接定位。
// AopUtils
public static boolean canApply(Pointcut pc, Class<?> targetClass, boolean hasIntroductions) {
    .........
    for (Class<?> clazz : classes) {
        Method[] methods = ReflectionUtils.getAllDeclaredMethods(clazz);
        for (Method method : methods) {
            if (introductionAwareMethodMatcher != null ?
                introductionAwareMethodMatcher.matches(method, targetClass, hasIntroductions) :
                methodMatcher.matches(method, targetClass)) {
                return true;
            }
        }
    }
    return false;
}
这里 introductionAwareMethodMatcher != null 为 true,就会执行 introductionAwareMethodMatcher.matches(method, targetClass, hasIntroductions),而这个都是返回 false ,最终跳出 for 循环执行 return 语句返回 false,而 canApply 返回 fasle 说明增强器没匹配上,所以需要了解原因还得进 introductionAwareMethodMatcher.matches 里面看,这个之前是没有分析过的。
// AspectJExpressionPointcut
public boolean matches(Method method, Class<?> targetClass, boolean hasIntroductions) {
    obtainPointcutExpression();
    ShadowMatch shadowMatch = getTargetShadowMatch(method, targetClass);
    if (shadowMatch.alwaysMatches()) {
        return true;
    }
    else if (shadowMatch.neverMatches()) {
        return false;
    }
    else {
        if (hasIntroductions) {
            return true;
        }
        RuntimeTestWalker walker = getRuntimeTestWalker(shadowMatch);
        return (!walker.testsSubtypeSensitiveVars() || walker.testTargetInstanceOfResidue(targetClass));
    }
}
这里判断是否匹配是通过 shadowMatch.alwaysMatches() 和 shadowMatch.neverMatches() ,ShadowMatch 是接口,具体方法逻辑得看实现类,可以将断点打在 shadowMatch.alwaysMatches() 行,发现实现类是 ShadowMatchImpl。
public class ShadowMatchImpl implements ShadowMatch {
    ........
    private FuzzyBoolean match;
    ........
    public boolean alwaysMatches() {
        return match.alwaysTrue();
    }

    public boolean neverMatches() {
        return match.alwaysFalse();
    }
}
而这两个方法都是通过变量 match 判断的,这里变量的类型是 FuzzyBoolean。FuzzyBoolean 有四个子类
public static final FuzzyBoolean YES   = new YesFuzzyBoolean();
public static final FuzzyBoolean NO    = new NoFuzzyBoolean();
public static final FuzzyBoolean MAYBE = new MaybeFuzzyBoolean();
public static final FuzzyBoolean NEVER = new NeverFuzzyBoolean();所以关键点是找到 ShadowMatch 中构造 FuzzyBoolean 的地方,方法一步一步往下走:
// AspectJExpressionPointcut
private ShadowMatch getTargetShadowMatch(Method method, Class<?> targetClass) {
    ..........
    return getShadowMatch(targetMethod, method);
}

private ShadowMatch getShadowMatch(Method targetMethod, Method originalMethod) {
    // 先从缓存中取
    ShadowMatch shadowMatch = this.shadowMatchCache.get(targetMethod);
	if (shadowMatch == null) {
        .........
   	    shadowMatch = obtainPointcutExpression().matchesMethodExecution(methodToMatch);
    	.........
    }
    return shadowMatch;
}
// PointcutExpressionImpl
public ShadowMatch matchesMethodExecution(Method aMethod) {
ShadowMatch match = matchesExecution(aMethod);
.....
return match;
}
private ShadowMatch matchesExecution(Member aMember) {
Shadow s = ReflectionShadow.makeExecutionShadow(world, aMember, this.matchContext);
ShadowMatchImpl sm = getShadowMatch(s);
sm.setSubject(aMember);
sm.setWithinCode(null);
sm.setWithinType(aMember.getDeclaringClass());
return sm;
}
private ShadowMatchImpl getShadowMatch(Shadow forShadow) {
org.aspectj.util.FuzzyBoolean match = pointcut.match(forShadow);
Test residueTest = Literal.TRUE;
ExposedState state = getExposedState();
if (match.maybeTrue()) {
residueTest = pointcut.findResidue(forShadow, state);
}
ShadowMatchImpl sm = new ShadowMatchImpl(match, residueTest, state, parameters);
sm.setMatchingContext(this.matchContext);
return sm;
}到这里就比较清晰了,pointcut.match(forShadow) 即根据切入点匹配返回了一个 FuzzyBoolean 变量,并作为 ShadowMatchImpl 构造方法里面的参数。进一步到 pointcut.match(forShadow) 方法中
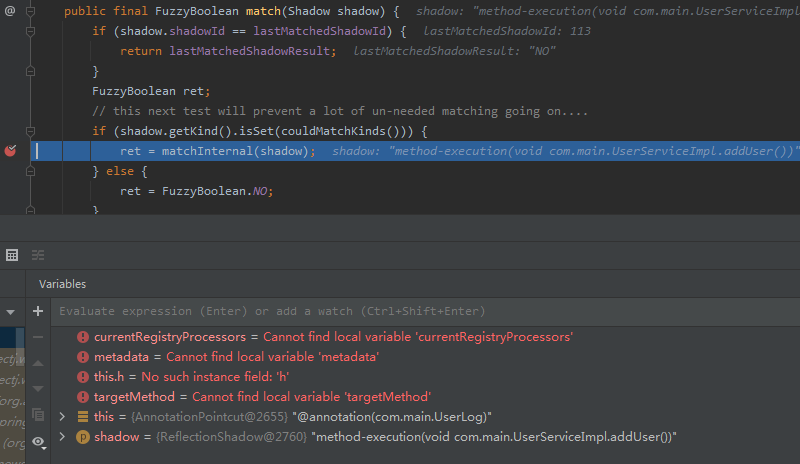
// PointCut
public final FuzzyBoolean match(Shadow shadow) {
    if (shadow.shadowId == lastMatchedShadowId) {
        return lastMatchedShadowResult;
    }
    FuzzyBoolean ret;
    // this next test will prevent a lot of un-needed matching going on....
    if (shadow.getKind().isSet(couldMatchKinds())) {
        ret = matchInternal(shadow);
    } else {
        ret = FuzzyBoolean.NO;
    }
    lastMatchedShadowId = shadow.shadowId;
    lastMatchedShadowResult = ret;
    return ret;
}
这里有一个 if 判断,将断点打在此处,可以看到会进入到 if 方法体里面执行 matchInternal 方法。
进入 matchInternal 方法,一步一步调试
protected FuzzyBoolean matchInternal(Shadow shadow) {
    AnnotatedElement toMatchAgainst = null;
    Member member = shadow.getSignature();
    ResolvedMember rMember = member.resolve(shadow.getIWorld());

    if (rMember == null) {
        if (member.getName().startsWith(NameMangler.PREFIX)) {
            return FuzzyBoolean.NO;
        }
        shadow.getIWorld().getLint().unresolvableMember.signal(member.toString(), getSourceLocation());
        return FuzzyBoolean.NO;
    }

    Shadow.Kind kind = shadow.getKind();
    if (kind == Shadow.StaticInitialization) {
        toMatchAgainst = rMember.getDeclaringType().resolve(shadow.getIWorld());
    } else if ((kind == Shadow.ExceptionHandler)) {
        toMatchAgainst = rMember.getParameterTypes()[0].resolve(shadow.getIWorld());
    } else {
        toMatchAgainst = rMember;
        if (rMember.isAnnotatedElsewhere()) {
           ........
        }
    }

    annotationTypePattern.resolve(shadow.getIWorld());
    // 最后走到这里
    return annotationTypePattern.matches(toMatchAgainst);
}
// ExactAnnotationTypePattern
public FuzzyBoolean matches(AnnotatedElement annotated) {
return matches(annotated, null);
}
public FuzzyBoolean matches(AnnotatedElement annotated, ResolvedType[] parameterAnnotations) {
if (!isForParameterAnnotationMatch()) {
boolean checkSupers = false;
if (getResolvedAnnotationType().isInheritedAnnotation()) {
if (annotated instanceof ResolvedType) {
checkSupers = true;
}
}
if (annotated.hasAnnotation(annotationType)) {
........
return FuzzyBoolean.YES;
} else if (checkSupers) {
........
}
} else {
........
}
return FuzzyBoolean.NO;
}核心是 annotated.hasAnnotation(annotationType),断点到此处:
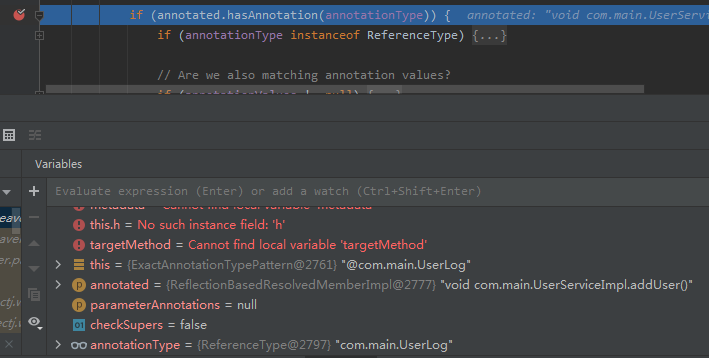
6.2.2 章节中创建代理对象时会取出被代理对象的所有方法进行匹配,这里 annotated 就可以看做是取出的某一个方法,annotationType 即为要匹配的类型,这里是 UserLog 注解。这一行就是判断方法上是否有对应注解。
// ReflectionBasedResolvedMemberImpl
public boolean hasAnnotation(UnresolvedType ofType) {
    boolean areRuntimeRetentionAnnotationsSufficient = false;
    if (ofType instanceof ResolvedType) {
        areRuntimeRetentionAnnotationsSufficient = ((ResolvedType)ofType).isAnnotationWithRuntimeRetention();
    }
    unpackAnnotations(areRuntimeRetentionAnnotationsSufficient);
    // 调用父类方法
    return super.hasAnnotation(ofType);
}

// 父类 ResolvedMemberImpl
protected ResolvedType[] annotationTypes = null;

public boolean hasAnnotation(UnresolvedType ofType) {
    if (backingGenericMember != null) {
        if (annotationTypes != null) {
            throw new BCException("Unexpectedly found a backing generic member and a local set of annotations");
        }
        return backingGenericMember.hasAnnotation(ofType);
    }
    if (annotationTypes != null) {
        for (int i = 0, max = annotationTypes.length; i < max; i++) {
            if (annotationTypes[i].equals(ofType)) {
                return true;
            }
        }
    }
    return false;
}
最终调用父类的 hasAnnotation 判断,遍历 annotationTypes 查找是否含有对应注解。这里猜测一下 annotationTypes 就是方法上的所有注解数组,而 hasAnnotation 中并没有初始化 annotationTypes 的地方。调用父类的 hasAnnotation 前还有一行方法调用: unpackAnnotations,看名字是解包注解的意思,点进去看一下,唉,就是在这里初始化的哦。
其实没有这么凑巧哦,都是一步一步调试找到的。
private void unpackAnnotations(boolean areRuntimeRetentionAnnotationsSufficient) {
    if (annotationFinder != null && (annotationTypes == null || (!areRuntimeRetentionAnnotationsSufficient && onlyRuntimeAnnotationsCached))) {
        // 这里
        annotationTypes = annotationFinder.getAnnotations(reflectMember, areRuntimeRetentionAnnotationsSufficient);
        onlyRuntimeAnnotationsCached = areRuntimeRetentionAnnotationsSufficient;
    }
}
通过注解查找器 annotationFinder 获取方法上面的注解。
public ResolvedType[] getAnnotations(Member onMember, boolean areRuntimeAnnotationsSufficient) {
    if (!(onMember instanceof AccessibleObject)) {
        return ResolvedType.NONE;
    }
    if (!areRuntimeAnnotationsSufficient) {
       ........
    }

    AccessibleObject ao = (AccessibleObject) onMember;
    // 这里获取注解
    Annotation[] anns = ao.getDeclaredAnnotations();
    if (anns.length == 0) {
        return ResolvedType.NONE;
    }
    ResolvedType[] annotationTypes = new ResolvedType[anns.length];
    for (int i = 0; i < anns.length; i++) {
        annotationTypes[i] = UnresolvedType.forName(anns[i].annotationType().getName()).resolve(world);
    }
    return annotationTypes;
}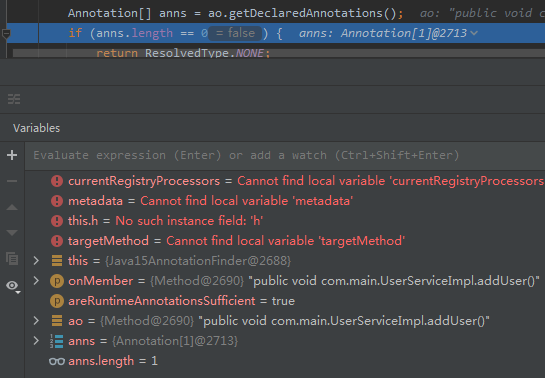
ao 就是 Method 对象,而 Method 的 getDeclaredAnnotations 方法只能获取到实现类本身方法上的注解,不能获取到对应接口方法上的注解。
评论区